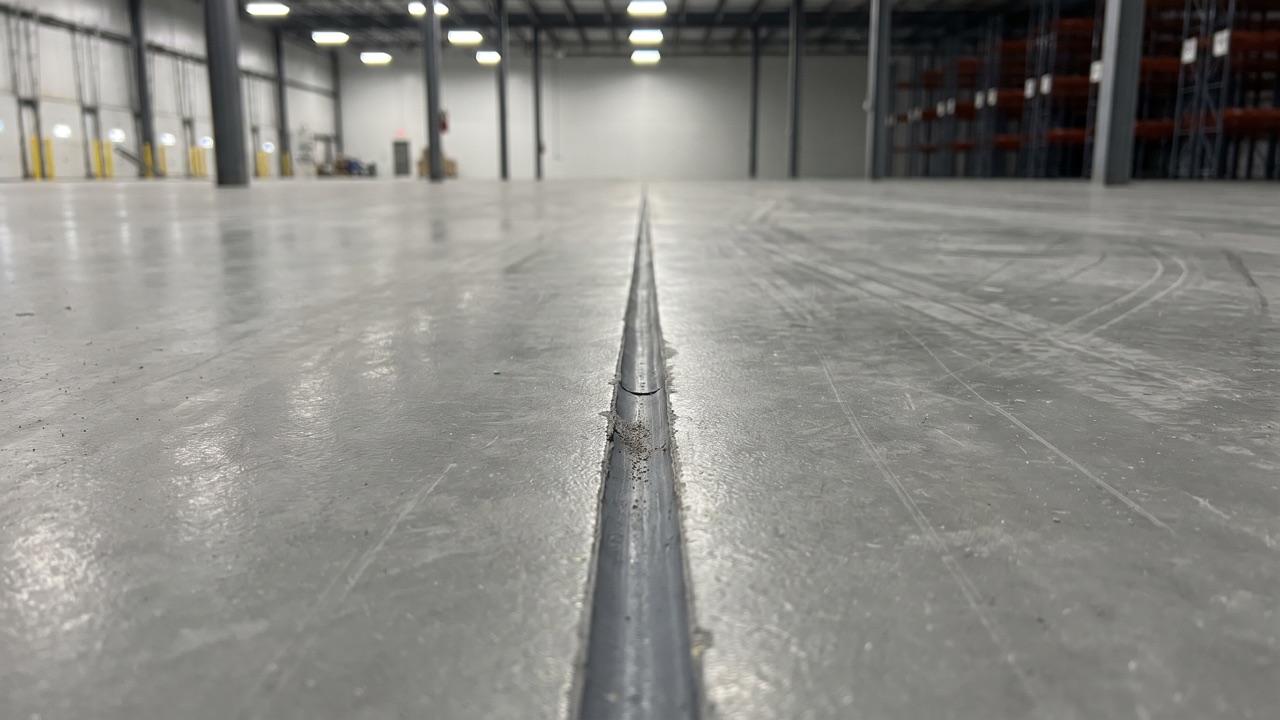
Epoxy floor control joints are the saw cuts made in a concrete slab shortly after it is poured, and they decide where the slab cracks as it shrinks. A coating that bridges or ignores a joint will usually show a straight crack along that line within a year, and a joint that is filled with the wrong material will spall at the edges under wheel traffic. If a floor has already cracked or telegraphed a joint, our epoxy floor repair in Phoenix service covers the correct fix, and this guide explains how to decide before the coating goes down.
Quick answer: A control joint is a deliberate weak line, so a crack above it is the slab moving, not the coating failing. Floors under forklift or heavy wheel traffic should have the joints cleaned and filled with a semi-rigid polyurea or epoxy filler. Light-duty residential floors often honor the joint instead, letting it show through the coating on purpose.
| Approach | Used for | Trade-off |
|---|---|---|
| Honor the joint | Garages, light residential | Joint line stays visible, no edge support |
| Fill with semi-rigid filler | Warehouses, forklift aisles | Supports edges, needs a cure and shave before coating |
| Crack isolation membrane | Active cracks, tenant spaces | Absorbs some movement, not all |
| Coat straight over the joint | Nowhere | Cracks in a straight line above the cut |
1. What a Control Joint Does and Why Your Slab Has Them
A control joint is a saw cut, usually a quarter of the slab depth, made in fresh concrete so the slab cracks along the cut instead of randomly across the floor. Every slab shrinks as it cures and dries, and the joint is the planned place for that movement to go.
ACI 302.1R, the guide for concrete floor and slab construction, covers joint spacing and timing. The cuts are made within hours of finishing, before the slab develops its own stress cracks, and the spacing depends on the slab thickness and the mix. In a typical warehouse the pattern is a grid of joints, and in a residential garage you may see one or two lines running across the floor.
The joint is doing its job when it opens a hairline. It is also the reason coatings crack along a straight line: the concrete underneath is still moving, and a rigid film on top has to give somewhere. Understanding that makes the coating decision easier, because the question is not whether the slab will move but what the coating will do when it does.
2. Honoring the Joint Versus Filling It: The Core Decision
Honoring the joint means the coating follows the cut, leaving a shallow groove, while filling it means packing the joint with a hard filler and coating across a flat surface. The right choice depends on the traffic the floor will carry.
Under forklifts and pallet jacks, the edges of an open joint take repeated impact from small hard wheels. Edges chip, a process called spalling, and the damage extends into the coating. For these floors the joint is cleaned out, filled flush with a semi-rigid material, and the coating is installed over the filled joint or cut back to it. Under cars and foot traffic, the load is spread across larger tires and an open joint does not spall, so the coating is often installed to honor the cut.
| Floor use | Wheel type | Usual decision |
|---|---|---|
| Residential garage | Car tires | Honor the joint |
| Retail and office | Carts, foot traffic | Honor or fill, by finish |
| Warehouse with forklifts | Small hard wheels | Fill with semi-rigid filler |
| Food and cleanroom | Carts, washdown | Fill, sealed and flush |
Make this call at the estimate, not after the first crack. A coating contractor who does not ask where the joints are and how the floor will be used has not decided it for you. Our epoxy garage floor Phoenix page explains the usual approach for home garages, where honoring the joint is the common choice.
One practical check is to walk the floor before the estimate and count the joints, note which ones have chipped edges, and photograph them. Chipped edges on an existing slab are the clearest sign that wheel traffic has already been loading an open joint, and they tell the installer that filling is the right call for that area. Joints that are clean and tight can usually be left to the coating plan for that room.
3. Semi-Rigid Fillers and Why Caulk Is the Wrong Product
A control joint under traffic needs a semi-rigid polyurea or epoxy filler, not caulk. Flexible caulk compresses under wheel load, which lets the joint edges chip, while a semi-rigid filler is hard enough to support the edge and still tolerates slab movement.
Joint sealant selection and use is addressed by ASTM C1193, which guides the choice of sealant for joints in buildings. The same logic applies to floor joints: match the material to the movement and the load. Filler hardness is measured on the Shore scale, and a semi-rigid filler for a floor sits much harder than a sealant for a wall.
- Clean the joint first. Dust, curing compound and old sealant prevent bond, and the joint walls are cleaned by vacuum and by grinding or sawing.
- Install a backer where the joint is deep. A backing rod stops the filler from sinking and controls its depth.
- Overfill slightly, then shave. The filler is allowed to cure and is shaved flush so the coating goes over a flat surface.
- Respect the cure time. Coating over a filler that has not cured can trap solvent and cause bubbles above the joint.
If a joint filler fails after a coating goes over it, the symptoms can look like peeling. The causes of blistering are covered in our guide on epoxy floor bubbling and peeling in Phoenix, and joint failure is a different problem with different fixes.
4. Crack Isolation Membranes and Where They Help
A crack isolation membrane is a flexible layer applied over a crack or joint before the coating so that slab movement is absorbed instead of transmitted to the surface. It reduces telegraphing, but it does not eliminate it where movement is significant.
Membranes work best on hairline cracks that are stable, such as a shrinkage crack that has stopped moving, and on cracks that are not part of an active joint. They are applied in a strip over the crack, usually with a reinforcing fabric, and the coating is installed over the membrane. In an active joint with measurable movement, the membrane stretches and eventually tears, so the joint is better handled by filling or honoring it.
The cost trade-off is real. A membrane adds labor and a cure step, and it leaves a slight raised ridge under a thin coating. For a decorative floor where the owner wants the line hidden, the membrane gives a reasonable chance, but the honest expectation is that the line may come back softly rather than disappearing for good.
5. Reading a Crack: Slab Movement or Coating Failure
A perfectly straight crack that sits directly above a saw cut is slab movement, not a coating failure. A crack that wanders, or that is accompanied by lifting, bubbling or loss of color, is a different problem.
- Straight and over a joint: Slab movement. Cosmetic, and the coating is sound on both sides.
- Straight, but not over a known joint: Usually a hidden joint or a pour boundary, or a crack that followed rebar. It is worth locating the joint plan.
- Wandering with hairline branches: Shrinkage or settlement cracking in the slab, with or without a coating.
- Crack with raised edges or lifted film: Bond failure. See the guide to epoxy floor delamination and recoating in Phoenix for how that decision is made.
The test that separates them is to tap beside the crack with a metal rod or a coin. A solid ring means the coating is bonded on both sides. A hollow sound means the film has lost bond near the line. Mark the cracks with chalk and take a photo in raking light, which makes any step or lifted edge visible.
6. Repairing a Joint That Has Already Telegraphed Through
A joint that has telegraphed through the coating is repaired by cutting it open, cleaning it, filling it with a semi-rigid filler and recoating the strip, not by painting over the crack. A surface patch will crack again along the same line.
The sequence is straightforward. The cracked coating is cut along the joint with a saw or grinder, the joint is cleaned to bare concrete, a backer rod goes in where the joint is deep, and the filler is installed and shaved flush. The surface is then ground slightly to blend, and a new coat is applied over the repair strip and feathered into the existing floor. Done well, the line reads as a deliberate, flush joint rather than a crack.
The wider repair process, including when a floor needs more than a local fix, is described in our epoxy floor repair guide for Phoenix. Phoenix adds one factor: summer slab temperature swings are large, and a slab that heats and cools daily moves at its joints more than a slab in a stable climate. That is one more reason to fill joints in floors under heavy traffic.
| Repair step | Purpose |
|---|---|
| Cut the cracked coating open | Exposes the joint walls |
| Clean to bare concrete | Allows the filler to bond |
| Backer rod where deep | Controls filler depth |
| Semi-rigid filler, shaved flush | Supports the edges under wheels |
| Recoat and feather the strip | Restores a continuous surface |
7. Frequently Asked Questions
Get a Free Quote for Joint Repair or a New Floor
Send us the joint layout and how the floor is used, and we will scope the filler, membrane and coating it needs.