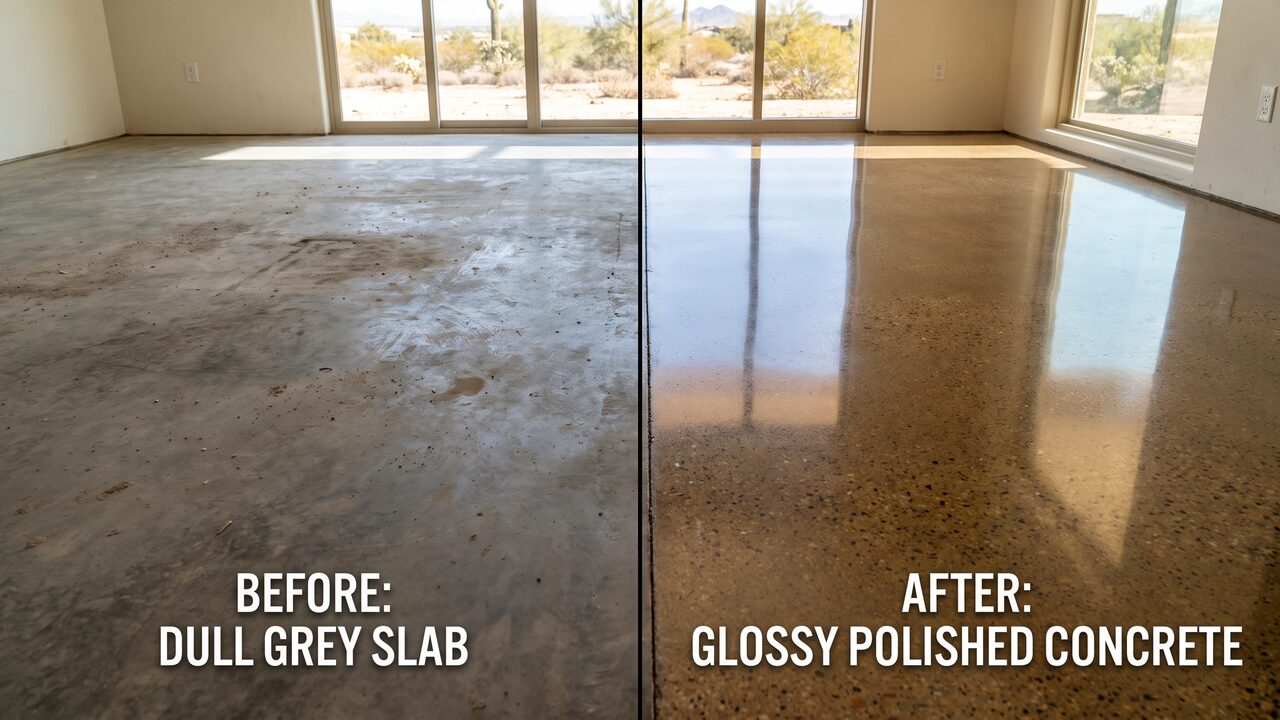
Photos sell concrete polishing Phoenix projects better than any spec sheet ever will, because the transformation from a dull, stained slab to a mirror-glossy or warm terrazzo-style floor is something homeowners and business owners genuinely have to see to believe. This roundup walks through ten real before-and-after outcomes from recent Phoenix jobs - spanning great rooms, retail floors, and full garage-to-living-space conversions - so you can see what's actually achievable on a slab similar to yours.
We deliberately picked projects that started from very different conditions: a clean builder-grade slab, a retail floor with old adhesive residue, and a garage with years of oil staining and cracking. If your floor looks closer to one of these starting points than to a glossy showroom photo, that's useful information - it tells you roughly how much prep work your project will need and what kind of timeline to expect.
1. Why Before-and-After Photos Matter When Choosing a Polisher
Before-and-after photos matter because concrete polishing results vary enormously based on the original slab's aggregate, age, and existing damage - seeing a contractor's actual completed work on comparable Phoenix concrete tells you far more than a general description of "polished concrete" ever could.
Two slabs that look similarly dull and grey before grinding can produce very different final results, because the aggregate size, distribution, and color hidden beneath the surface only reveal themselves once grinding begins. A contractor with a documented portfolio of real Phoenix transformations - not stock photography - is showing you their actual capability, and it's worth asking any polisher you're considering for photos of jobs similar in age and slab type to your own.
2. Case Study: Scottsdale Great Room Full Aggregate Reveal
This Scottsdale great room started as a standard builder-grade slab with a flat, uniform grey appearance and no visible aggregate. The homeowner wanted a full aggregate reveal - grinding deep enough to expose the natural stone content within the concrete - paired with a warm amber dye to complement the room's desert-modern interior.
The process took four grinding passes at progressively finer grit, followed by a two-part dye application and a high-gloss densifier sealer. The finished floor shows a rich, varied stone pattern that reads almost like natural terrazzo, with none of the flat uniformity of the original slab. This is the transformation homeowners are most often picturing when they first ask about polished concrete floors for a great room or open living space.
What made this particular slab a strong candidate for full aggregate reveal was the quality and consistency of the stone content once we ran the test grind - not every Phoenix slab has aggregate worth exposing this dramatically, which is exactly why we always recommend a small test area before committing to a full-depth grind. The homeowner's maintenance routine is now limited to dust mopping and an occasional damp mop, since the densifier and sealer combination makes the surface highly resistant to everyday spills and foot traffic.
3. Case Study: Tempe Retail Store Level 3 Gloss
A Tempe boutique retail store needed a durable, attractive floor that could handle daily foot traffic without the maintenance burden of tile grout lines. The original concrete had years of adhesive residue from a removed vinyl composition tile (VCT) floor, requiring an aggressive initial grinding pass just to reach clean concrete.
We took the floor to a Level 3 gloss (a semi-polished sheen, less reflective than Level 4 "high gloss" but still attractive and low-maintenance) with a light grey dye to unify the slab's uneven original coloring. The result gave the store a bright, modern retail floor that photographs well for their social media while dramatically cutting their weekly cleaning time compared to the old VCT.
For a retail environment, gloss level is a real business decision, not just an aesthetic one. A Level 4 mirror finish shows foot traffic scuffing and dust faster under bright storefront lighting than a Level 3 satin sheen does, so for a shop with continuous daytime traffic, the slightly lower gloss level was the more practical choice - it still photographs beautifully but requires less frequent burnishing to keep looking fresh between our recommended maintenance visits.
4. Case Study: Chandler Garage-to-Living-Space Conversion
A Chandler homeowner converting a garage into a home gym and media room needed the concrete floor to go from rough, oil-stained garage slab to a finish appropriate for a living space. This project required the most prep work of the group: degreasing, multiple grinding passes to remove old oil staining, and crack filling before polishing could begin.
| Case Study | Starting Condition | Finish Applied | Project Length |
|---|---|---|---|
| Scottsdale Great Room | Flat, uniform grey slab | Full aggregate reveal, amber dye, Level 4 gloss | 4 days |
| Tempe Retail Store | VCT adhesive residue | Light grey dye, Level 3 gloss | 3 days |
| Chandler Garage Conversion | Oil-stained, cracked garage slab | Charcoal dye, crack repair, Level 4 gloss | 5 days |
After crack repair and a charcoal dye application, the finished floor reads as an intentional, high-end design choice rather than a converted garage - a transformation that consistently surprises homeowners who assumed their garage slab was too far gone to polish.
The extra two days on this project came entirely from prep: oil staining doesn't grind away in a single pass the way surface dirt does, and cracks need to be filled and cured before the finish grinding stages begin, or they'll telegraph through the final polish. Homeowners considering a similar garage conversion should budget extra time for this stage rather than expecting the same timeline as a clean interior slab - it's the single biggest variable in how long a project like this takes.
Seven More Phoenix Transformations at a Glance
Beyond the three detailed walkthroughs above, these additional Phoenix projects round out the range of results a professional polish can achieve across different slab conditions and design goals:
- Ahwatukee kitchen and dining slab: A dated, sealed concrete floor with a yellowed topical coating was stripped, ground to Level 2 satin, and finished in a soft warm-grey dye to match new cabinetry.
- Gilbert restaurant dining room: Heavy foot traffic had worn the original finish unevenly; a full regrind and Level 4 gloss with a clear densifier restored a uniform, easy-to-clean surface for the dining floor.
- Peoria home office conversion: A spare-bedroom slab under old carpet was ground and dyed a deep charcoal for a modern, low-maintenance home office floor.
- Glendale auto showroom: A large-format showroom floor received a bright white-dyed Level 4 polish to maximize light reflection under the dealership's overhead lighting.
- Mesa basement rec room: A previously bare, dusty basement slab was densified and polished to a satin sheen, eliminating concrete dust while keeping a natural grey tone.
- Tempe office lobby: An outdated tile lobby floor was demolished down to the slab, then polished with a mid-grey dye and Level 3 gloss for a clean, contemporary entryway.
- Chandler wine cellar and tasting room: A custom dark charcoal dye and high-gloss finish gave this below-grade space a dramatic, reflective floor suited to its dim ambient lighting.
Each of these ten projects started from a different combination of slab age, prior flooring, and design goal - which is exactly the point. Concrete polishing isn't a single fixed look; it's a process that adapts to what's actually underneath your existing floor and the finish you're aiming for.
5. What These Projects Have in Common
Every one of these Phoenix transformations shares the same underlying process: a test grind to understand the slab's hidden aggregate and condition, progressive grinding through finer grit stages, a dye or stain decision based on the space's design intent, and a densifier plus sealer to lock in gloss and protect against staining.
- Test grind first: Every project started with a small test area to preview aggregate exposure and confirm the gloss level before committing to the full floor.
- Prep work varies widely: A clean interior slab might need minimal prep, while an oil-stained garage or adhesive-covered retail floor requires significant additional grinding before true polishing begins.
- Color transforms the result: Dye and stain choices, more than gloss level alone, are what give each of these floors its distinct character.
- Sealer protects the investment: A quality densifier and topical sealer is what keeps a newly polished Phoenix floor looking like day one for years, especially in high-traffic commercial settings.
If your project involves outdoor square footage alongside an interior polish, it's worth discussing concrete grind and seal or stained concrete options for those areas, since exterior slabs need different sealer chemistry than an interior showroom-gloss floor. And if you're weighing polished concrete against a coated system for a room like a kitchen or laundry, our residential epoxy guide covers how the two options compare for everyday living spaces.
The most useful thing any of these ten projects can tell you isn't the finished photo itself - it's the starting condition. Match your own floor to the case study closest to its current state, and you'll have a realistic idea of the scope, timeline, and prep work involved before you ever request a quote.
6. Frequently Asked Questions
See What Your Floor Could Look Like
Free on-site assessment and a preview test grind for your Phoenix concrete polishing project.